 Skip to content

Have you purchased a new blender and have no idea what to do with it? If so, you’re in for a great surprise with these top ninja blender recipes for FAST, EASY snacks and meals.
You’re Nutri Ninja (or any high speed blender) is indeed a versatile kitchen gadget. You will be utterly surprised and amazed when you see just how many different, healthy recipes you can achieve with it.
All of the recipes in this post are mostly whole foods plant based, mostly raw, completely healthy and they all taste great.
Try the nice-cream and smoothie bowls and you will never again need to buy high sugar, shop bought ice-cream again. They are addictive; and the best thing… it’s all GUILT FREE!
Why you need a high speed blender in your life
A good quality blender is an essential item in your kitchen. Good quality doesn’t necessarily have to break the bank in the blender world. Just don’t buy the cheapest. Cheap blades will buckle under the pressure of frozen fruits, veggies and sometimes ice-cubes (I’ve sent a couple of blenders to an early grave this way myself).
Go for middle of the range such as a Nutri Ninja, or something else in the mid-range price mark. They do last out for at least a couple of years (even being used daily) if you’re sensible with them and don’t over run or burn out the motor.
You don’t necessarily need a Ninja for these recipes because any similar quality, high speed motor blender will work just as well.
I’m merely using the Ninja as an example because I own one myself, and I find them to be the best quality for the least amount of money (and I’ve tried and tested many).
Disclaimer
Before we go on onto your Nutri Ninja recipes, be aware that you should never add big chunks of anything frozen into any blender, no matter how high quality the blender is. Make sure you don’t add anything bigger than your average, thick slice of banana.
This post contains affiliate links of which I make a small commission at no extra cost to you should you make a purchase. This helps to keep my website afloat and me blogging, bringing you great advice and plant based tips.
Ninja Blender Recipes
1. NICE-CREAM BOWLS
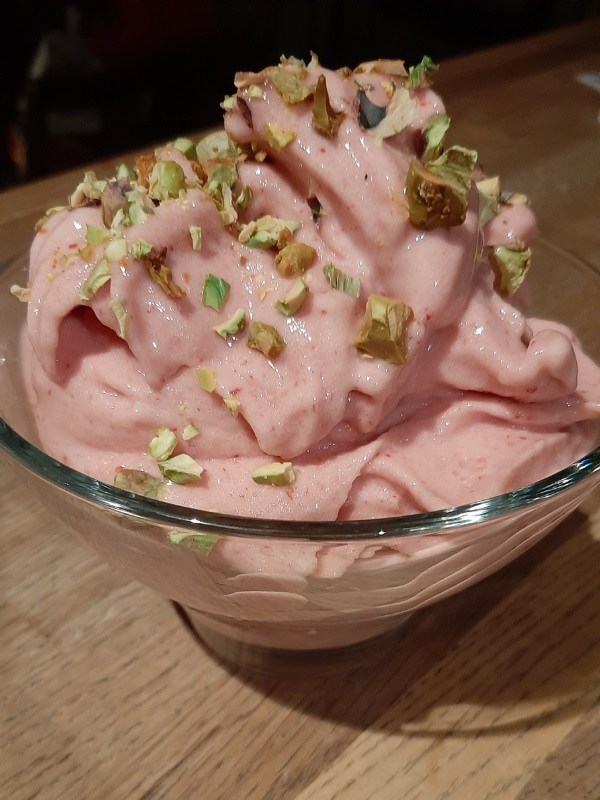
There’s an art of the perfect nice-cream bowl that you will perfect over time.
But, don’t sweat it if you don’t quite hit the mark first time and the whole thing ends up more of a smoothie than an ice-cream. It will still taste delicious, just a different texture to your classic nice-cream bowl.
However, once you do get that nice-cream bowl right, you’ll NEVER miss that sugary, shop bought rubbish again. This is a promise 🙂 Just keep practicing.
How to make the perfect nice-cream bowl
Your base will consist of sliced, frozen, ripe banana and a little plant milk, vegan yogurt or coconut cream.
Depending on how much fat and calories you wish to consume you can use any of these. If you would like a true, creamy ice-cream then you can’t beat a tablespoon of thick coconut cream, along with your splash of plant milk.
Add your frozen, sliced banana and other frozen fruits of choice. You want about a 50/50 split of banana to other fruits for the best texture (creamy and not too icy).
Fruit combos that make the best ice-cream are as follows:-
- SRAWBERRIES & CREAM – Banana, strawberries and coconut cream.
- ANTIOXIDANT RICH TURMERIC & MANGO – Banana, mango, turmeric (powder or fresh), plant milk.
- BLUEBERRY BEAUTY – Banana, blueberry and coconut cream.
- CHOCOLATE CHERRY – Banana, cherry and cacao powder, plant milk or coconut cream.
- BANOFFEE PIE – Banana, 1 x tablespoon of peanut butter, coconut cream, maple syrup to taste.
Check out some other totally delicious smoothie bowl recipes here.
Tips for making nice-cream
- Add about an inch of plant milk to your blender before anything else. This is to prevent you other ingredients sticking on the bottom.
- Pre slice/chop your bananas and any larger fruits before you freeze them. Smaller fruits like berries are usually okay to be added as they are.
- The riper the fruit, the better. Very ripe, frozen banana is the best for an nice-cream bowl because it will give it a lovely gooey texture.
- Add minimal fluids to begin with (apart from your inch of milk at the bottom to start), then add more very slowly as you go. You want to keep blending for a few seconds, then shaking or banging your blender cup on a tea towel to knock your fluids down to the bottom so you can get a good spin going. This may take a bit of practice and patience. Don’t burn out your blender motor by keeping it on when you don’t have a spin going. You will be able to hear and see the difference. The art is to be able to get your ingredients spinning for 25 seconds straight with minimal fluids to keep your texture. It just takes a bit of practice.
- If you don’t like bananas in your nice-cream then you can sub with coconut cream, plant based yogurt, or even just plant milk (though it won’t be as creamy with just milk, but more of a sorbet).
- Sometimes you may need to add a drizzle of sweetener, depending on the ripeness and sweetness of your fruits. I like to use maple syrup for this job as it’s very sweet, so you only need a little. But, feel free to use any sweetener you like.
- You may wish to add superfood powders to your nice-cream bowl. These can include spirulina (though this will make it go green), superfruit berry powders, or maca, lacuma, camu camu, mushroom, acai and baobab powders are all good too to add an even bigger nutritional hit.
Nice-Cream Bowl Toppings
For added health benefits, texture and crunch, you may like to add some tasty toppings to your nice-cream bowl. Here’s some great examples, but anything goes:-
- Chopped nuts of any kind – Brazil, walnuts, pecans, hazelnuts, peanuts
- Seeds – Chia, sunflower, flax, pumpkin, hemp
- Chopped, very dark chocolate
- Cacao nibs
- Coconut flakes/desiccated
- Chopped fruits, fresh or frozen
- Homemade Granola
2. SMOOTHIE BOWLS
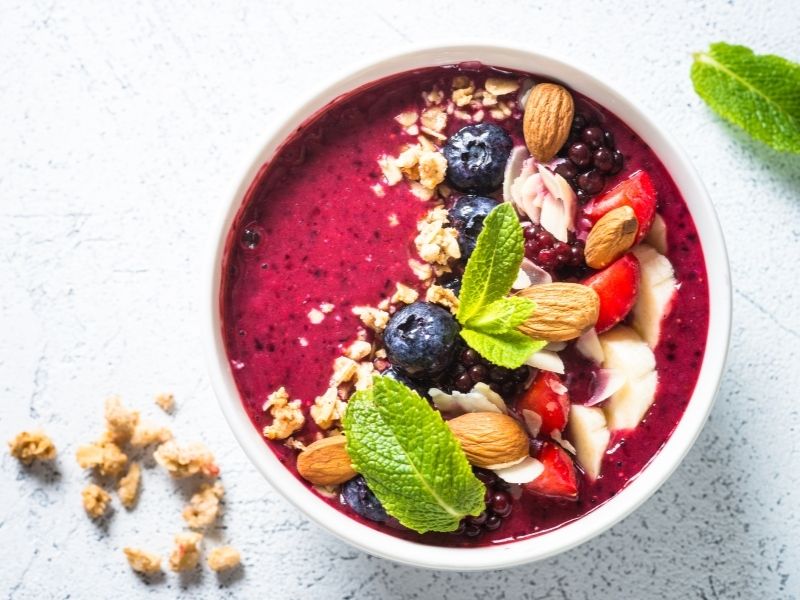
Smoothie bowls are very similar to nice-cream bowls, but can be more of liquid consistency. It’s still good to use frozen banana and other fruits because they will help give it a great texture and keep it nice and cold.
For a smoothie bowl, you would be more inclined to use more veggies and green leafy produce.
For instance, you could use spirulina powder, wheatgrass, spinach, kale, Swiss chard and avocados. All of these along with your frozen fruits. You can use a flat bowl to serve, then top with the same toppings as the nice-cream bowls.
OR, alternatively you can make you nice-cream the same as the above nice-cream bowl recipes, just more of a smoothie bowl texture. It depends on what you like. Why not experiment?
Acai bowl recipe
Acai is a superfruit powder that is a great addition to any smoothie or nice-cream bowl. The acai berry is a powerful antioxidant (3x more powerful than even blueberries), and a nutritional powerhouse of vitamins, minerals and fatty acids.
Make your perfect Acai bowl smoothie from the following ingredients whizzed up in your high speed blender:-
- 1 x heaped teaspoon of organic, raw Acai powder
- 1 x large, frozen, very ripe, sliced banana
- 1 x cup of frozen raspberries
- 100ml of plant milk (or as little as possible to make a thick ice-cream texture)
- A drizzle of maple syrup for extra sweetness (optional)
- Vanilla essence (optional)
- Any toppings of your choice – nuts, seeds, dark chocolate, coconut, fruits etc
3. CLASSIC SMOOTHIES

A classic smoothie would be served in a glass like a drink, as opposed to a bowl. Your high speed blender is perfect for this as it will froth your smoothie up for a great texture.
If you wish for a cold milkshake type texture then always add either some frozen banana or ice-cubes to your mix. You will find doing this makes all the difference to the finished result, and is a must for a superior smoothie.
Smoothie Recipe Examples
You can make up a smoothie from almost anything to hand. But, it helps to always have one or two base ingredients if you would like it to be a complete and filling meal or snack.
Filling base ingredients include:-
- Avocado
- Banana
- Dates
- Dried figs
- Soya, oat, or coconut yogurt
- Small handful of nuts or seeds
- Protein powders (not necessary but some people like to use them, especially if they are in training)
Other ingredients:-
- Chopped greens such as kale, spinach, Swiss chard, beetroot (chopped small), apples, pears, mango, frozen or fresh berries, maple syrup
Other potential add-ins:-
- Superfood powder
- Maca powder
- Superfruits powders
- Spirulina
- Wheatgrass
- Moringa
Check out some more of my great fat burning, green smoothie recipes and experiment to find out what you like. The kids will love these mild recipes too!
4. EASY HUMMUS
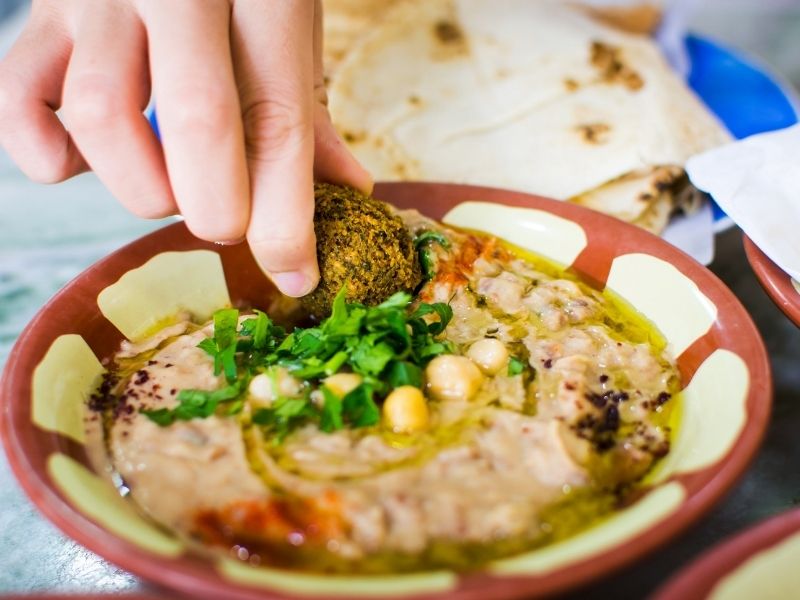
It’s so easy to knock up a quick hummus that it’s really not worth buying it from the store. Plus, it will also taste so much better.
This way you can also control ingredients and make it completely oil free; so healthier and less calories without compromising on taste.
Ingredients:-
- 1 x can of drained chickpeas (drain loosely, as you will need a little of the liquid to help mix)
- Juice of 1/2 a lemon
- 1 x tablespoon of tahini paste
- 2 x cloves of fresh garlic (pre-crushed)
- Salt and pepper to taste
Blend your can of drained chickpeas, lemon, tahini, garlic, salt, pepper, and maybe a little more fluid (water or lemon juice) to desired consistency. You will need to keep tasting and adjusting the flavours to get it just right.
This is a simple recipe that is also very versatile and is great served in a sandwich, on crackers or as a vegetable dip.
5. CASHEW CREAM
Soaked, raw cashews make an excellent cream for all your culinary needs. You can use this cream as you would ordinary cream on cakes, pies, and even in your smoothie/nice-cream bowls.
Ingredients:-
- 1 x cup of soaked, raw, unsalted cashew nuts (pre-soaking measurement)
- 1/4 of a cup of melted coconut oil, OR 1/2 a cup of low-fat, canned coconut cream
- Vanilla essence to taste
Blend pre-soaked cashews (at least an hour soaking) with a little coconut cream/oil, and vanilla essence for a creamy topping for cakes and puddings.
You will need to blend for a good few minutes to get the creamy, smooth texture that you are looking for in a cream, so be patient and keep checking it.
Add melted chocolate for a delicious chocolate ganache!
This is an especially great topping for raw carrot cake! Be aware that if you don’t use the coconut oil then the cream won’t set and will be slightly runnier, so may not be ideal as a cake filling.
6. SALAD & VEGETABLE DRESSINGS
AVOCADO DRESSING
Ingredients:-
- 1/2 a ripe avocado
- 2 x tablespoons of plant milk
- 1 x teaspoon apple cider vinegar
- Squeeze of lemon, garlic powder to taste
- 1/4 teaspoon of paprika
- Salt and pepper to taste
TAHINI DRESSING
Ingredients:-
- 1/2 cup of unsweetened soy milk
- 2 x cloves of minced garlic
- juice of 1 lemon
- 3 x tablespoons of tahini
- 2 x dates
Blend all ingredients together, adding fluid based ingredients fist to prevent sticking. Make sure you always taste test before you serve to check for the correct amount of seasoning.
Both of these dressings are great with a raw salad, or as a topping for roasted veggies. They are hearty, filling, wholesome, and will turn veggies and salad into a compete meal on their own. So, no need for other sides.
7. NUT BUTTER
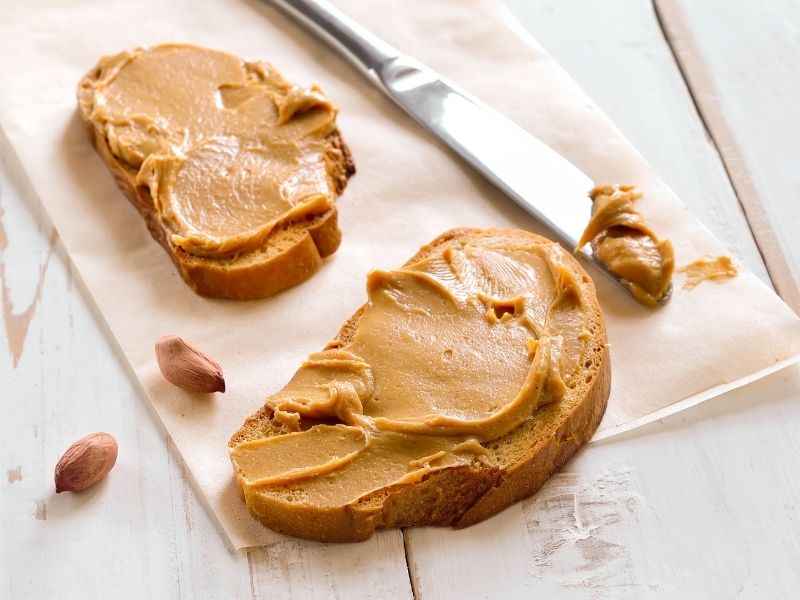
Yes, it’s true, you can make an absolutely delicious peanut (or any other nut) butter in your blender, and it’s so simple too.
Ingredients:-
- 2 x cups of peanuts, almonds, walnuts, hazelnuts or pecans (pre-roasted is good if you like a roasted flavour, or leave raw if you would like to hold in more nutrition.
- 1/2 teaspoon of salt
- A drizzle of sweetener, such a maple or agave syrup to taste (completely optional)
- 1-2 tablespoons of peanut oil if you wish to make a more smooth and creamy nut butter
- Other potential add in’s are: Cinnamon, nutmeg, ginger, and vanilla essence, depending on your taste
Blend everything for 1 minute. Scrape down sides to make sure everything is being combined evenly, then blend for another minute. Scrape down the sides again and give it one last blast.
If you would like a creamy nut butter, then make sure you keep blending to get that perfect texture. Don’t stop too soon.
Store in an a sealed glass container in the refrigerator for up to two weeks.
8. COCONUT BUTTER
Prepare to have your mind blown! Did you know can make quick and easy coconut butter with just ONE ingredient?
Yes, you sure can. Just blend up your desiccated coconut (or coconut flakes) until they turn into a butter. The process takes about 60 seconds from start to finish. First you will see a fine powder, but keep pulsing and it will magically turn into a butter as those oils are released.
If you wish to add some sweetness or flavourings, then just use the same extras as for the nut butter above.
9. NUT MILK
Another great use for your Ninja Blender is making easy nut milk. Why buy that expensive shop bought stuff when you can easily make your own?
Homemade also means no added nasties such as preservatives, additives and thickeners.
Ingredients:-
- 2 x cups of pre-soaked (for at least 2 hours) almonds or cashew nuts
- Optional sweetener of agave or maple syrup to taste
Method:-
- Add pre-soaked nuts to your blender, along with roughly double the ratio of purified water and your optional sweetener. It’s good to add just half the water at first as it blends easier, then keep adding more to desired consistency. You may like a thicker or thinner milk depending on your taste and use for it.
- You can then either strain your milk through a muslin cloth for a silky smooth texture, OR keep it the way it is for a whole foods plant based version that works great on cereals and in baking. You will probably need to strain it for beverages. But, even strained, you may still find that it doesn’t actually work as well in your tea and coffee as the shop bought, so bear this in mind.
10. TEN SECOND OAT FLOUR
Don’t ever buy oat flour from a store if you have a blender at home. Literally, NO NEED!
Oat flour in a blender takes seconds to make. You quite literally just add your required amount of oats and pulse for a few seconds or to desired fineness. That’s it, you’re done. And, your flour is ready to be used in baking, or whatever other reason you may need it for.
TIP: The amount of oats (in cups) you put into your blender to make you flour will probably differ by the time you have milled it. Always take the measurement for your recipes after you have milled it, to be sure you have your correct ratios.
11. HIGH PROTEIN PANCAKE MIX
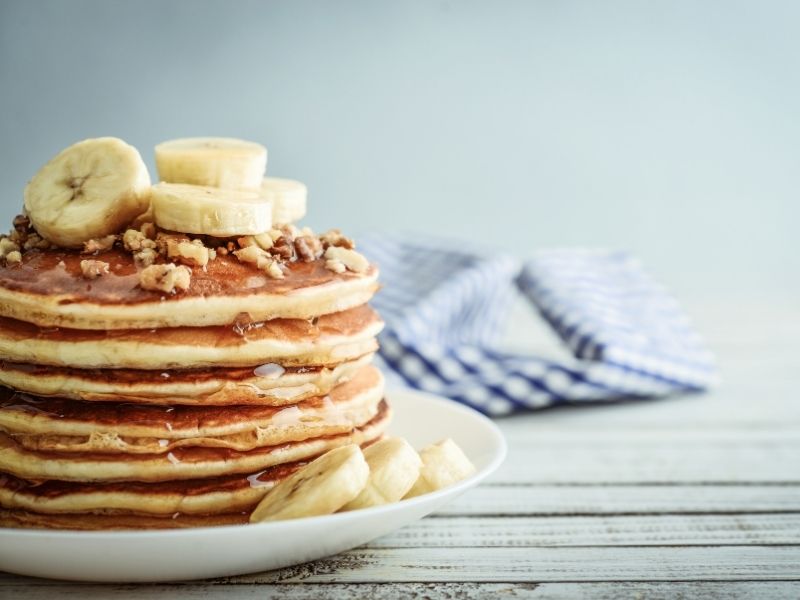
Make this easy batter and pour straight from the blender into your hot pan.
Ingredients:-
(makes enough pancakes for 2 people)
- 1 x cup of buckwheat flour
- 1 x cup of plant milk
- 1 x cup of water
- Chia egg (made from 1 x tablespoon of milled chia seed mixed with 3 tablespoons of water, then left to sit for 5 minutes in separate bowl or small cup)
- Pinch of salt
Method:-
- Blend all your ingredients to a thick batter consistency, which will take about 2o seconds to achieve. Add more or less water/buckwheat flour to make your batter thick enough to completely cover the back of a spoon, thickly.
- You can fry this mixture oil-free in a good non-stick pan. OR, frying in a touch of coconut oil tastes delicious with these too!
- Top with your favorite toppings. I like the classic lemon and sugar combo (except I like to use coconut sugar because it’s marginally healthier and has a caramely taste).
Grab your Ninja and start creating today!

CONCLUSION
I’m sure we’ve only just scraped the surface with what you can create with a good quality blender like the Nutri Ninja. But, the 100% healthy recipes in this post are a great start.
The blender is a truly versatile and essential piece of kitchen equipment that will never end up sitting lonely on your top shelf, so it’s well worth the investment.
Lastly…
Thank you for visiting ZestForever today.
We hope we have given you inspiration to get some whizzing going down in your kitchen. Enjoy your creations.