Easy, 2 Minute Ice-Cream Made In A Blender - Sugar Free!
Equipment
- High speed blender
- Chopping board
- Chopping knife
Ingredients
- 1 large or 1.5 medium sized very ripe, frozen bananas You MUST freeze your bananas in advance. It is always best to slice, then freeze in a plastic container.
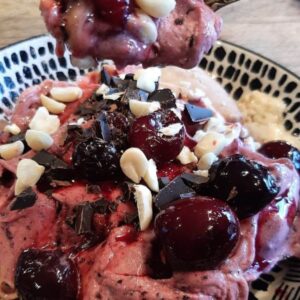
- ½ cup frozen strawberries, raspberries, blueberry, pineapple or cherries. OR 1 T of smooth, nut butter if you would like a non fruity version. If making with nut butter, then you can add 3-4 ice-cubes as it will hold well and make more.
- Roughly 50ml plant milk Soy milks tend to blend better because they are higher protein. You want a smooth blend, not a grainy or icy texture. You may have to experiment with your milks.
- Maple or other sweetener Optional. If your bananas are very ripe when you freeze them then you should not need extra sweetener.
- You can add cacao powder too. Goes especially well with the peanut butter or the cherry version.
- Toppings of choice Potential topping choices are chocolate chips, desiccated coconut, fresh fruits, chopped nuts and seeds.
Instructions
- Be sure to chop and freeze your bananas before-hand. Try to use very ripe banana if you like your ice-cream sweet and gloopy textured. If not, you may need some sweetener, but very ripe bananas work best for this ice-cream. You can freeze your chopped banana in a Tupperware or plastic container and poke it out with a blunt knife.
- Prepare your optional toppings before you begin your ice-cream making. Chop chocolate, nuts, seeds etc on a chopping board ready to add to the finished result.
- Add about 1.5 inches of plant milk to your blender to begin with. You can always add more as you go, but try a little amount for your first attempt as you want to keep this an ice-cream texture and not a smoothie. Some blenders take less milk than others to make your ice-cream, depending on their brand and powder.
- Put the rest of your ingredient ON TOP of your milk. Do not put your other ingredients in first because they may stick to the bottom.
- Now whizz on full power for 30 seconds. You need to count the 30 seconds AFTER you get a full spin going. This amount of time is what makes your ice-cream as creamy as it can be, whilst still being virtually fat free. If you cannot get a spin going straight away, take off, undo and add a dash more milk, then start spinning again. Once you have put the blender blade back on you can bang all the ingredients down to the blade on a tea towel. This helps you to get the spin going. DO NOT let your blender spin for any length of time if it isn't blending properly or you may burn out your blender motor. You have to have a proper spin going so you don't risk this. Always stop and gently bang down, or add more milk, if you can't get a spin going.
- Once you have blended properly for 25-30 seconds you are ready to serve. If adding toppings, it's good to serve in a breakfast bowl so you can flatten it down like a smoothie bowl and sprinkle your toppings all over.
- Eat immediately. Do not be tempted to freeze this ice-cream because it doesn't work and goes rock hard and icy.